ViewChild(ren) & ContenChild(ren) 可以讓Component取得template裡的其他Component,取得後就可以操作該component了,而這功能搭配使用,所產生出來的效果是非常強大的.
在之前的文章有提到View和Content的差異性,Angular2的ViewChild(ren)和ContentChild(ren)也是根據該原則搜尋取得Component(s)
- [View|Content]Child : 回傳單一物件
- [View|Content]Children: 回傳QueryList<型別>, 是一個陣列
ViewChild & ViewChildren
宣告
1
2
3
4
5
6
7
8
9
10
11
12
13
14
15
16
17
| export interface ViewChildDecorator {
(selector: Type<any>|Function|string, {read}?: {read?: any}): any;
new (selector: Type<any>|Function|string, {read}?: {read?: any}): ViewChild;
}
export const ViewChild: ViewChildDecorator = makePropDecorator(
'ViewChild',
[
['selector', undefined], {
first: true,
isViewQuery: true,
descendants: true,
read: undefined,
}
],
Query);
|
1
2
3
4
5
6
7
8
9
10
11
12
13
14
15
16
| export interface ViewChildrenDecorator {
(selector: Type<any>|Function|string, {read}?: {read?: any}): any;
new (selector: Type<any>|Function|string, {read}?: {read?: any}): ViewChildren;
}
export const ViewChildren: ViewChildrenDecorator = makePropDecorator(
'ViewChildren',
[
['selector', undefined], {
first: false,
isViewQuery: true,
descendants: true,
read: undefined,
}
],
Query);
|
使用方式
1
| @ViewChild(@selector) variable: typeOf Variable(can be any)
|
搜尋的@selector可以傳入的型別有 Type<any>|Function|string,可以直接搜尋ReferenceId或是Component Class.
- selector by string: 搜尋ReferenceId(eg. #id), 如果找到相對應的Element有對應的component, 會回傳該Component, 如果沒有找到對應的Component,則回傳 ElementRef型別,如果ReferenceId找不到時,就回傳Undefined
- selector by ComponentClass: 搜尋By Component Class, 如果有符合時,回傳Component Type, 否則回傳Undefined
LifeHook
ViewChild(ren) 會在 AfterViewInit 之後,才能取得到資料,
範例
Sample 1 (利用ReferenceId)
1
2
3
4
5
6
7
8
9
10
11
12
13
14
15
16
17
18
19
20
21
22
23
24
25
26
27
28
29
30
31
32
33
34
35
36
37
38
| @Component({
selector: 'app-input',
template: `
<input type="text" />
`
})
export class InputComponent {
name: string = 'this is inputComponent';
}
@Component({
selector: 'app-root',
template: `
<label>by referebce id #input</label>
<input type="text" #input1 />
<br/>
<label>by component</label>
<app-input #input2></app-input>
<br />
<button type="button" (click)="getValue()">getValue</button>
`,
styles: []
})
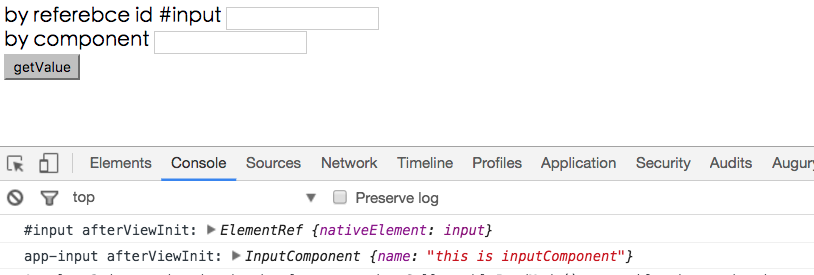
export class AppComponent implements AfterViewInit {
@ViewChild('input1') input1: ElementRef;
@ViewChild('input2') input2: InputComponent;
constructor() { }
ngAfterViewInit() {
console.log('#input afterViewInit:', this.input1);
console.log('app-input afterViewInit:', this.input2);
}
getValue() {
console.log(this.input1.nativeElement.value);
}
}
|
Console log的結果
Sample2 (by ComponentClass)
1
| @ViewChild(InputComponent) input2: InputComponent;
|
結果如上
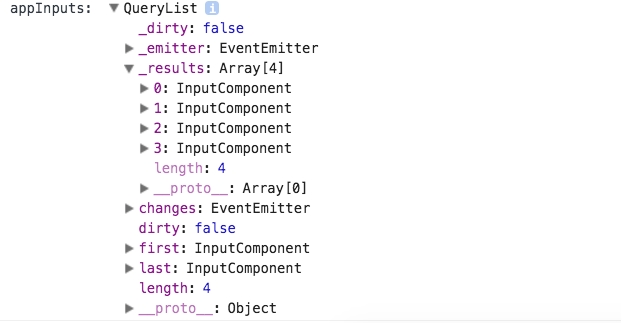
Sample3 (ViewChildren)
1
2
3
4
5
6
7
8
9
10
11
12
13
14
15
16
17
| @Component({
selector: 'app-root',
template: `
...
<app-input #input2></app-input>
<app-input></app-input>
<app-input></app-input>
<app-input></app-input>
...
`,
styles: []
})
export class AppComponent implements AfterViewInit {
...
@ViewChildren(InputComponent) appInputs: QueryList<InputComponent>;
...
}
|
輸出結果
ContentChild & ContentChildren
宣告
1
2
3
4
5
6
7
| export interface ContentChildDecorator {
(selector: Type<any>|Function|string, {read}?: {read?: any}): any;
new (selector: Type<any>|Function|string, {read}?: {read?: any}): ContentChild;
}
|
使用方式
1
| @ContentChild(@selector) variable: typeOf Variable(can be any)
|
搜尋的@selector可以傳入的型別有 Type<any>|Function|string,可以直接搜尋ReferenceId或是Component Class.
- selector by string: 搜尋ReferenceId(eg. #id), 如果找到相對應的Element有對應的component, 會回傳該Component, 如果沒有找到對應的Component,則回傳 ElementRef型別,如果ReferenceId找不到時,就回傳Undefined
- selector by ComponentClass: 搜尋By Component Class, 如果有符合時,回傳Component Type, 否則回傳Undefined
- 這裡所指的ReferenceId是指ParentControl在使用子Component時,於Content Area所指定的ReferenceId. 基於此理由,搜尋by ComponentClass會比較準確,也比較直覺
LifeHook
ContentChild(ren) 會在 AfterContentInit 之後,才能取得到資料,
範例
sample (search By Component Class)
1
2
3
4
5
6
7
8
9
10
11
12
13
14
15
16
17
18
19
20
21
22
23
24
25
26
27
28
29
30
31
32
33
34
35
36
37
38
39
40
41
42
43
44
45
46
47
48
| @Component({
selector: 'app-input',
template: `
<input type="text" />
<ng-content select="app-label"></ng-content>
`
})
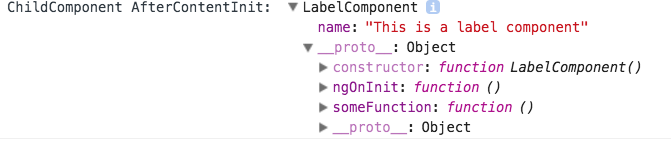
export class InputComponent implements AfterContentInit {
@ContentChild(LabelComponent) content: any;
name: string = 'this is inputComponent';
constructor() { }
ngAfterContentInit() {
console.log('ChildComponent AfterContentInit: ', this.content);
}
}
@Component({
selector: 'app-label',
template: `
<p>
label works!
</p>
`
})
export class LabelComponent implements OnInit {
name: string = 'This is a label component';
constructor() { }
ngOnInit() {
}
someFunction() {
}
}
template: `
...
<app-input>
<app-label></app-label>
</app-input>
...
|
輸出結果
Sample 2(search by ReferenceId)
這裡所指的ReferenceId是指在parentComponent內所定義的Id
1
2
3
4
5
6
7
8
9
10
11
12
13
14
15
16
17
18
19
20
21
22
23
24
25
| @Component({
selector: 'app-input',
template: `
<input type="text" />
<ng-content select="app-label"></ng-content>
`
})
export class InputComponent implements AfterContentInit {
@ContentChild('label') content: any;
name: string = 'this is inputComponent';
constructor() { }
ngAfterContentInit() {
console.log('ChildComponent AfterContentInit: ', this.content);
}
}
<app-input #input2>
<app-label #label></app-label>
</app-input>
<app-input>
<app-label #label></app-label>
</app-input>
|
輸出結果同上,這裡有另外一個需要注意的地方,#[id] 如果是在View階層時,是不能有重複的,但是如果是Content階層時,在不同的View Component是可以重複的,因為是生存不在不同的scope.
應用
一個Tbas套件的組成可以是一個tabs下面有多個tab, 大概會是長這樣
1
2
3
4
5
6
7
8
9
10
11
| <tabs>
<tab>
<p>This Tab Content 1</p>
</tab>
<tab>
<p>This Tab Content 1</p>
</tab>
<tab>
<p>This Tab Content 1</p>
</tab>
</tabs>
|
所以我們至少需要兩個Components, tabs和tab
1
2
3
4
5
6
7
8
9
10
11
12
13
14
15
16
| import {Component,Input} from 'angular2/core';
@Component({
selector: 'tab',
template: `
<p [hidden]="!show">
<ng-content></ng-content>
</p>
`
})
export class TabComponent {
@Input()
tabTitle:string;
show:boolean = false;
}
|
1
2
3
4
5
6
7
8
9
10
11
12
13
14
15
16
17
18
19
20
21
22
23
24
25
26
27
28
29
30
31
32
33
34
35
36
37
38
39
40
41
42
43
44
45
46
47
48
49
50
51
52
53
54
55
56
57
58
| import {Component,ContentChildren,QueryList,AfterContentInit} from 'angular2/core';
import {TabComponent} from './tab';
@Component({
selector: 'tabs',
template: `
<ul class="tab-list">
<li *ngFor="#tab of tabs" [class.active]="selectedTab===tab" (click)="onSelect(tab)">
{{tab.tabTitle}}
</li>
</ul>
<ng-content></ng-content>
`,
styles: [`
.tab-list{
list-style:none;
overflow:hidden;
padding:0;
}
.tab-list li{
cursor:pointer;
float:left;
width:60px;
height:30px;
line-height:30px;
text-align:center;
background-color:gray;
}
.tab-list li.active{
background-color:red;
}
`]
})
export class TabsComponent implements AfterContentInit {
@ContentChildren(TabComponent)
tabs:QueryList<TabComponent>;
selectedTab:TabComponent;
ngAfterContentInit() {
this.select(this.tabs.first);
}
onSelect(tab) {
this.select(tab);
}
select(tab) {
this.tabs.forEach((item)=>{
item.show = false;
});
this.selectedTab = tab;
this.selectedTab.show = true;
}
}
|
1
2
3
4
5
6
7
8
9
10
11
12
13
14
15
16
17
18
19
20
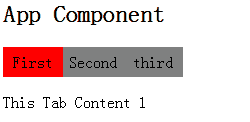
| @Component({
selector: 'my-app',
template: `
<h2>App Component</h2>
<tabs>
<tab tabTitle="First">
<p>This Tab Content 1</p>
</tab>
<tab tabTitle="Second">
<p>This Tab Content 2</p>
</tab>
<tab tabTitle="third">
<p>This Tab Content 3</p>
</tab>
</tabs>
`,
directives: [TabsComponent,TabComponent]
})
export class AppComponent {
}
|
顯示效果
延伸閱讀