原本 Angular 就提供動態載入 Component 的方式,但是 Angular 又提供另外一種更簡單的方式,ngComponentOutlet,簡單到一個變態的境界
Overview
1
2
3
4
5
6
7
8
9
| directive NgComponentOutlet implements OnChanges, OnDestroy {
constructor(_viewContainerRef: ViewContainerRef)
ngComponentOutlet: Type<any>
ngComponentOutletInjector: Injector
ngComponentOutletContent: any[][]
ngComponentOutletNgModuleFactory: NgModuleFactory<any>
ngOnChanges(changes: SimpleChanges)
ngOnDestroy()
}
|
基本款
在介紹之前,先簡單看一下程式碼
1
2
3
4
5
6
7
| @Component({
selector: 'ng-component-outlet-simple-example',
template: `<ng-container *ngComponentOutlet="Hello"></ng-container>`
})
class NgTemplateOutletSimpleExample {
Hello = HelloComponent;
}
|
沒錯,就只有這樣。這是不是比另外一種動態載入 Component 的方式更簡單
- 備註: 只要是要動態載入的,就必須在
ngModule 的 entryComponents 裡註冊
進階使用
Injector
當想要動態載入的 Component 需要注入其他服務時,又該如何處理呢,還好 ngComponentOutlet 也有提供 injector 的方法
1
2
3
4
5
6
7
8
9
10
11
12
13
14
15
16
17
18
19
20
21
22
23
| import { Component, Injector, ReflectiveInjector } from '@angular/core';
import { HelloComponent } from './hello/hello.component';
import { GreeterService } from './greeter.service';
@Component({
selector: 'app-root',
template: `
<ng-container *ngComponentOutlet="HelloWorld;
injector: myInjector">
</ng-container>
`,
styleUrls: ['./app.component.css']
})
export class AppComponent {
HelloWorld = HelloComponent;
myInjector: Injector;
constructor(injector: Injector) {
this.myInjector = ReflectiveInjector.resolveAndCreate(
[GreeterService],
injector
);
}
}
|
Content
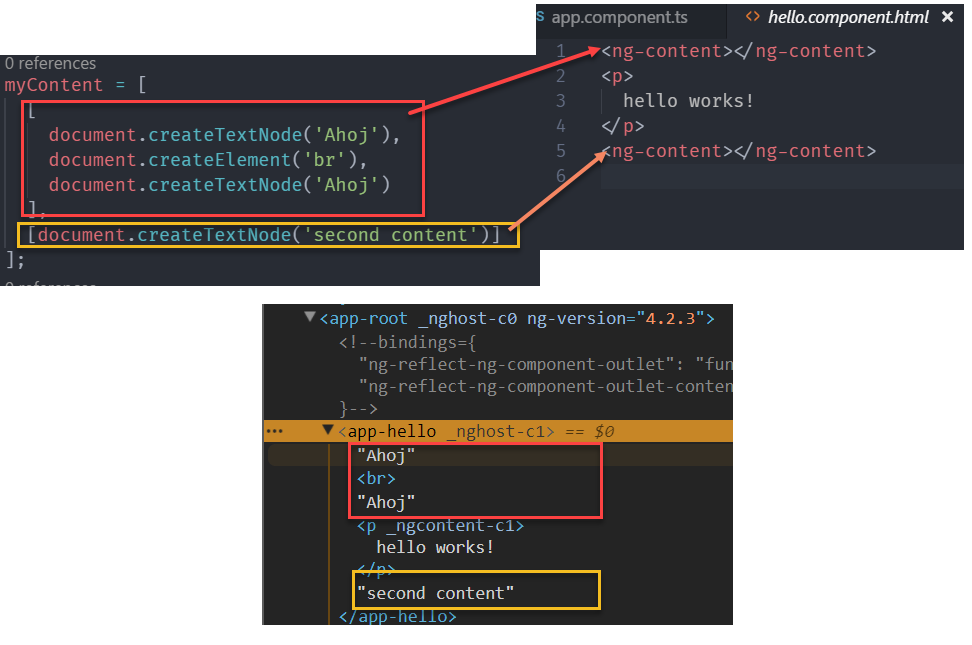
如果動態載入的Component, 有 <ng-content> 時,要如何將內容填入呢? ngComponentOutlet 有提供 content 的方式可以將 DOM 內容傳入並顯示
1
2
3
4
5
6
7
8
9
10
11
12
13
14
15
16
17
18
19
20
21
22
| import { Component, Injector, ReflectiveInjector } from '@angular/core';
import { HelloComponent } from './hello/hello.component';
import { GreeterService } from './greeter.service';
@Component({
selector: 'app-root',
template: `
<ng-container *ngComponentOutlet="HelloWorld;
content: myContent">
</ng-container>
`,
styleUrls: ['./app.component.css']
})
export class AppComponent {
HelloWorld = HelloComponent;
myContent = [
[document.createTextNode('Ahoj')],
[document.createTextNode('second content')]
];
constructor() {}
}
|
- 注意:
content 接受一個二微陣列,陣列的第一層的順序,是依 <ng-content> 的顯示順序
- 第二層的這陣列,則是所屬的
<ng-content> 要顯示的內容
- 需使用 document.createXX 的方式建立顯示內容
顯示結果

ngModuleFactory
如果想要載入的 Component 是來自其他的 Module 時,又該怎麼處理呢? 這時就要利用 ngModuleFactory 了,寫法也很簡單,請參閱下面的程式碼
1
2
3
4
5
6
7
8
9
10
11
12
13
14
15
16
17
18
19
20
21
22
| import { Component, Compiler, NgModuleFactory } from '@angular/core';
import { HelloComponent } from './other/hello/hello.component';
import { OtherModule } from './other/other.module';
@Component({
selector: 'app-root',
template: `
<ng-container *ngComponentOutlet="HelloWorld;
ngModuleFactory: myModule">
</ng-container>
`,
styleUrls: ['./app.component.css']
})
export class AppComponent {
HelloWorld = HelloComponent;
myModule: NgModuleFactory<any>;
constructor(compiler: Compiler) {
this.myModule = compiler.compileModuleSync(OtherModule);
}
}
|
- 這裡的
OtherModule 不需要事先 Import 到 AppModule 裡
範例: 動態切換
1
2
3
4
5
6
7
8
9
10
11
12
13
14
15
16
17
18
19
20
21
22
23
24
25
26
27
28
29
30
31
32
33
34
| import { Component, Compiler, NgModuleFactory } from '@angular/core';
import { GreeterService } from './greeter.service';
import { HelloComponent } from './other/hello/hello.component';
import { OtherModule } from './other/other.module';
import { WorldComponent } from './other/world/world.component';
@Component({
selector: 'app-root',
template: `
<ng-container *ngComponentOutlet="HelloWorld;
ngModuleFactory: myModule">
</ng-container>
<button type="button" (click)="switch()">switch</button>
`,
styleUrls: ['./app.component.css']
})
export class AppComponent {
HelloWorld: any;
myModule: NgModuleFactory<any>;
constructor(compiler: Compiler) {
this.myModule = compiler.compileModuleSync(OtherModule);
this.HelloWorld = HelloComponent;
}
switch() {
if (this.HelloWorld.name === 'HelloComponent') {
this.HelloWorld = WorldComponent;
} else {
this.HelloWorld = HelloComponent;
}
}
}
|
參考資料
