在Part 1提到在aciton裡面,如果有需要呼叫api的行為,都會發生這個階段 目前有發現有兩種方式可以處理api.

  1. angular的service(http call)
  2. fetch api

如果利用第二種方式處理api call時,可以直接寫在action裡面。但是如果想要利用angular的service方式時,就要繞一下路了 但是,還是先簡單的寫一下fetch的方式

1
2
3
4
5
6
7
8
9
10
11
12
13
14
15
16
17
export function loadTodo() {
return dispatch => {
return fetch('api/Values')
.then((response) => {
return response.json()
})
.then((data) => {
return ({
type: TODO_INIT,
payload: data
});
})
.then((action) => {
dispatch(action);
})
}
}

利用service的code如下

1
2
3
4
5
6
7
8
9
10
11
12
13
14
15
16
17
18
19
20
21
22
23
24
25
26
import {Injectable, Inject } from 'angular2/core';

import {Http, Response} from 'angular2/http';
import 'rxjs/Rx';
import {TODO_INIT} from '../constants';

@Injectable()
export class TodoService {
constructor(
@Inject('ngRedux') private store,
private http: Http) {

}

loadTodo() {
return this.http.get('api/Values')
.map((res) => { return res.json() })
.map((d) => ({
type: TODO_INIT,
payload: d
}))
.subscribe((action) => {
this.store.dispatch(action);
})
}
}

Redux是根據Facebook的flux所產出的一個架構. 簡單介紹請參考這裡

簡單的動作及資料流程如下 Untitled Diagram.png

複雜一點的流程圖如下 moreDetailReduxFlow.png

每一個階段都有他應該要做的事情 - Action: 處理資料,呼叫API, 任何有可能產生副作用的行為都在這階段處理, 通常都是回傳JSON object.
- Reducer: 根據Action傳來的動作和資料,來決定與原本的資料(In Store)的關係,例如、新增、更新、移除或過濾等,回傳要顯示在View上面的資料

##程式碼 @Component程式的基本架構

1
2
3
4
5
6
7
8
9
10
11
12
13
14
15
16
17
18
19
20
21
22
23
24
25
26
27
28
29
30
31
32
33
34
35
36
37
38
39
40
41
42
43
44
45
46
47
48
49
50
51
52
53
54
55
56
import {
Component,
Inject,
ApplicationRef
} from 'angular2/core';

import * as TodoAction from '../../actions/ToDo';


@Component({
selector: 'ck-todo-app',
template: require('./TodoPage.html')
})
export class CkTodoApp {
private disconnect: Function;
private unsubscribe: Function;

private items: any;
private task: any;

constructor(
@Inject('ngRedux') private ngRedux,
private applicationRef: ApplicationRef) {
}

ngOnInit() {
this.disconnect = this.ngRedux.connect(
this.mapStateToThis,
this.mapDispatchToThis)(this);

this.unsubscribe = this.ngRedux.subscribe(() => {
this.applicationRef.tick();
});
}

ngOnDestroy() {
this.unsubscribe();
this.disconnect();
}

// 註冊store到變數上
mapStateToThis(state) {
return {
items: state.todo,
task: state.newtodo
};
}

// 註冊功能到這個Class裡
mapDispatchToThis(dispatch) {
return {
add: (task) => dispatch(TodoAction.add(Object.assign({}, task))),
remove: (task) => dispatch(TodoAction.remove(task))
};
}
};

TodoPage.html

1
2
3
4
5
6
7
8
9
10
11
12
<div class="clearfix mx-auto col-8">
<h3>TODO App</h3>
<div class="clearfix mxn2">
<input type="text" [(ngModel)]="task.content" class="input inline-block" />
<button class="btn btn-primary inline-block" (click)="add(task)">Add</button>
</div>
<div class="clearfix mxn2">
<ul class="list-reset" *ngFor="#item of items">
<li>{{ item.content }} <span (click)="remove(item)">x</span></li>
</ul>
</div>
</div>

###註冊Store as provider in Angular2 application

1
2
3
4
5
6
7
8
9
10
11
12
13
14
15
16
17
18
19
20
21
import { enableProdMode, provide } from 'angular2/core';
import { bootstrap} from 'angular2/bootstrap';
import { ROUTER_PROVIDERS, APP_BASE_HREF } from 'angular2/router';
import { CkDemoApp } from './containers/main-app';

// 註冊redux store用
import configureStore from './store/configure-store';
const provider = require('ng2-redux').provider;
const store = configureStore({});

declare let __PRODUCTION__: any;

if (__PRODUCTION__) {
enableProdMode();
}

bootstrap(CkDemoApp, [
provider(store),
ROUTER_PROVIDERS,
provide(APP_BASE_HREF, { useValue: '/' })
]);

store/configureStore

1
2
3
4
5
6
7
8
9
10
11
12
13
14
15
16
17
18
19
20
21
22
23
24
25
26
27
28
29
30
///<reference path="./dev-types.d.ts"/>

import {createStore, applyMiddleware, compose} from 'redux';
import {fromJS} from 'immutable';
import ReduxThunk from 'redux-thunk';
import rootReducer from '../reducers';
const persistState = require('redux-localstorage');

function configureStore(initialState) {
const store = compose(
_getMiddleware()
)(createStore)(rootReducer, initialState);

return store;
}

function _getMiddleware() {
let middleware = [
ReduxThunk
];

if (__DEV__) {
middleware = [...middleware];
}

return applyMiddleware(...middleware);
}

export default configureStore;

設定ACTIONs

actions/Todo

1
2
3
4
5
6
7
8
9
10
11
12
13
14
import { TODO_ADD, TODO_REMOVE } from '../constants';
export function add(task) {
return {
type: TODO_ADD,
data: task
}
}

export function remove(task) {
return {
type: TODO_REMOVE,
data: task
}
}

設定可以使用的Reducers

reducers/index

1
2
3
4
5
6
7
8
9
10
11
import { combineReducers } from 'redux';
// reducer functions
import {todo, newtodo} from './todo';

// 下面的名稱是要存取store資料時的名稱
// ex. state.todo
export default combineReducers({
todo,
newtodo
});

reducers/todo.ts

1
2
3
4
5
6
7
8
9
10
11
12
13
14
15
16
17
18
19
20
21
22
23
24
25
26
import { fromJS, List } from 'immutable';
import { TODO_ADD, TODO_REMOVE } from '../constants';

const INITIAL_STATE = List<any>();

// todo Reducer
export function todo(state = INITIAL_STATE, action: any = { type: '' }) {
switch (action.type) {
case TODO_ADD:
return state.push(action.data);
case TODO_REMOVE:
return state.remove(state.indexOf(action.data));
default:
return state;
}
}

// newtodo Reducer
export function newtodo(state = { content: '' }, action: any = { type: '' }) {
switch (action.type) {
case TODO_ADD:
return { content: '' };
default:
return state;
}
}

CODE

參考資料: - Angular 2 — Introduction to Redux - Angular 2 and Redux - redux - ng2-redux - immutable.js - work with service

今天透過Visual studio 2015 執行webpack時,竟然返回錯誤訊息。 
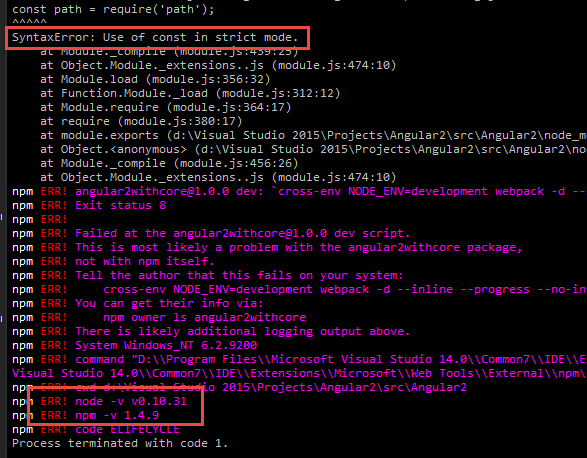
我確定該webpack.config.js是可以跑的,但是為什麼在Visual studio 2015裡面執行卻是不行的,結果發現理由是node跟npm的版本有關係 我的webpack.config.js裡面有下’use strict’; 然後有使用到const, 所以VS就不開心了. 因為所使用的node版本不認識ES2015的東西.

解決方式是讓visual studio執行npm command時,使用本機電腦所使用的版本而不是Visual studio本身所用的版本, 將 ** $(PATH)**移到最上面

這樣子的設定就可以讓VS在執行npm時,就會按照上圖的順序去找執行

基本版

根據官方文件的作法,當一個formflow完成後,那個Converstaion就會結束,不管之後再傳給bot什麼文字,Bot都不會有任何反應, 除非一個新的ConverstaionID重新建立

但是,在某些訊息環境,是沒有辦法更新ConverstaionID的. 這時候就需要自訂一個Dialog來處理FormComplete及其他的情形 就像官方文件所提到的Dialog是非常強大的

1
2
3
4
5
6
7
8
9
10
11
12
13
14
15
16
17
18
19
20
21
22
23
24
25
26
27
28
29
30
31
32
33
34
35
36
37
38
39
40
41
42
43
44
45
46
47
48
49
50
51
52
[Serializable]
public class SandwichDialog : IDialog
{
private readonly BuildForm<SandwichOrder> SandwichOrderForm;

internal SandwichDialog(BuildForm<SandwichOrder> SandwichOrderForm)
{
this.SandwichOrderForm = SandwichOrderForm;
}

public async Task StartAsync(IDialogContext context)
{
context.Wait(MessageReceivedAsync);
}

public async Task MessageReceivedAsync(IDialogContext context, IAwaitable<Message> argument)
{
var message = await argument;
var pizzaForm = new FormDialog<SandwichOrder>(new SandwichOrder(), this.SandwichOrderForm, FormOptions.PromptInStart);
context.Call<SandwichOrder>(pizzaForm, FormComplete);
}

private async Task FormComplete(IDialogContext context, IAwaitable<SandwichOrder> result)
{
SandwichOrder order = null;
try
{
order = await result;
}
catch (OperationCanceledException)
{
await context.PostAsync("You canceled the form!");
return;
}
catch (Exception ex)
{
await context.PostAsync(ex.Message);
return;
}

if (order != null)
{
await context.PostAsync(order.ToString());
}
else
{
await context.PostAsync("Form returned empty response!");
}

context.Wait(MessageReceivedAsync);
}
}

這個是當pizzaForm完成後,則執行FormComplete.

1
context.Call<T>(pizzaForm, FormComplete);

在 FormComplete 裡面,可以取得使用者所輸入的選項,所以後續要處理的動作會寫在此處

Gist

先從基本的開始,跟著下面的文章做,就可以完成基本的Bot功能了 http://docs.botframework.com/connector/getstarted/#navtitle

注意事項

  1. 當在新增【My Bot】時,Endpoint的網址一定要用https, 不然之後在測試Bot Connector時會出現403, 無法授權等奇怪的狀況.

  2. 如果使用web chat embed code時,要把他們所提供網址裡的s=[secret] 改成 t=[secret]

###程式基本的運作方式

Bot在與Bot Connector之間的溝通是透過傳遞Message. 這個Message裡面會包含很多資訊,也可以保留狀態(所以可以建立一連串的問題,就像在執行npm init時會問一堆問題一樣) 網站參考

總結: 一切都是在玩弄Message這個物件阿.

基於Docker安裝步驟變簡單了,所以是時候來玩Docker了. 在MVC Core的目錄下,新增一個檔案Dockfile, 內容如下

1
2
3
4
5
6
7
8
FROM microsoft/aspnet:1.0.0-rc1-update1

COPY . /app
WORKDIR /app
RUN ["dnu", "restore"]

EXPOSE 5000/tcp
ENTRYPOINT ["dnx", "-p", "project.json", "web","--server.urls", "http://0.0.0.0:5000"]

**server.urls 需要指定到0.0.0.0:port, 不然在docker run起來的時候,網頁會說Refused to Connect server.urls的設定方式可以參考這裡

開啟命令視窗,到有Dockerfile檔案的資料夾並執行下列指令

1
docker build -t <imageName> .

上列指令這會建立一個docker image file 接下來就要讓所建立出來的Image執行起來, 執行下列指令

1
docker run -t -d -p 5000:5000 <imageName>

詳細的Docker指令用法,請參閱官方網站

###今天下載了docker Toolbox for windows ,根據安裝指示安裝後,在執行時出現了一個錯誤訊息

1
hyper-v is installed. virtualbox won't boot a 64 bits vm in hyper-v is activated ....

排除方式為:修改 Program Files\Docker Toolbox\start.sh 在start.sh檔裡面,尋找

1
"${DOCKER_MACHINE}" create -d virtualbox "${VM}" 

更改成

1
"${DOCKER_MACHINE}" create --virtualbox-no-vtx-check -d virtualbox "${VM}"

即可排除此錯誤訊息

###當在command下docker command時,出現以下錯誤訊息

1
An error occurred trying to connect: Get http://127.0.0.1:2375/v1.22/containers/json: dial tcp 127.0.0.1:2375: connectex: No connection could be made because the target machine actively refused it.

排除方式為

  1. docker-machine start default or create new one
  2. docker-machine ls will show you your machine running
  3. docker-machine env --shell cmd default and you’ll see something like

SET DOCKER_TLS_VERIFY=1 SET DOCKER_HOST=tcp://xxx.xxx.xxx.xxx:2376 SET DOCKER_CERT_PATH=C:\Users\Arseny.docker\machine\machines\default SET DOCKER_MACHINE_NAME=default REM Run this command to configure your shell: REM FOR /f 「tokens=*」 %i IN (『docker-machine env --shell cmd default』) DO %i

4.Run

1
FOR /f "tokens=*" %i IN ('docker-machine env --shell cmd default') DO %i

5.Enjoy. 就可以正常的下docker指令了

目前開發所需的gulpfile.js版本 工作流程 for angular 1.x開發 [typescript]->[javascript]->[webpack]->bundle.js

1
2
3
4
5
6
7
8
9
10
11
12
13
14
15
16
17
18
19
20
21
22
23
24
25
26
27
28
29
30
31
32
33
34
35
36
37
38
39
40
41
42
43
44
45
46
47
48
49
50
51
52
53
54
55
56
57
58
59
60
61
62
63
64
65
66
67
68
69
70
71
72
73
74
75
76
77
78
79
80
81
82
83
84
85
86
87
'use strict';

var gulp = require('gulp'),
tsc = require('gulp-typescript'),
inject = require('gulp-inject'),
tsProject = tsc.createProject('tsconfig.json'),
webpack = require('webpack'),
gulpWebpack = require('webpack-stream'),
ngAnnotatePlugin = require('ng-annotate-webpack-plugin'),
path = require('path');

gulp.task('compile-ts', function () {
var sourceTsFiles = ['./app/src/**/*.ts', //path to typescript files
'./app/typings/**/*.ts']; //reference to library .d.ts files


var tsResult = gulp.src(sourceTsFiles)
.pipe(tsc(tsProject));

tsResult.dts.pipe(gulp.dest('./app/dist'));
return tsResult.js.pipe(gulp.dest('./app/dist'));
});

gulp.task('gen-ts-refs', function () {
var target = gulp.src('./app/src/app.d.ts');
var sources = gulp.src(['./app/src/**/*.ts'], { read: false });
return target.pipe(inject(sources, {
starttag: '//{',
endtag: '//}',
transform: function (filepath) {
if (filepath.indexOf('index') > -1) { return; }
if (filepath.indexOf('app.d.ts') > -1) { return; }
return '/// <reference path="../..' + filepath + '" />';
}
})).pipe(gulp.dest('./app/src/'));
});

gulp.task('watch', function () {
gulp.watch(['./app/src/**/*.ts'], ['webpack']);
});

gulp.task('webpack', ['compile-ts'], function () {
return gulp.src('./app/dist/app.js')
.pipe(gulpWebpack({
entry: {
bundled: './app/dist/app.js',
commands: './app/dist/libs.js'
},
output: {
filename: '[name].js',
},
resolve: {
// this tells Webpack where actually to find lodash because you'll need it in the ProvidePlugin
alias: {
lodash: path.resolve(__dirname, './node_modules/lodash'),
angular: path.resolve(__dirname, './node_modules/angular')
},
extensions: ['', '.js']
},
module: {
loaders: [
{ test: /[\/]angular\.js$/, loader: "exports?angular" }
]
},
plugins: [
new webpack.ContextReplacementPlugin(/moment[\/\\]locale$/, /en/),
// this tells Webpack to provide the "_" variable globally in all your app files as lodash.
new webpack.ProvidePlugin({
_: "lodash",
}),
new ngAnnotatePlugin({
add: true
})
// new webpack.optimize.CommonsChunkPlugin('common.js'),
//new webpack.optimize.UglifyJsPlugin({
// compress: {
// warnings: false
// },
// output: { comments: false }
//})

]
}))
.pipe(gulp.dest('./Scripts'));
})

gulp.task('default', ['watch']);

package.json

1
2
3
4
5
6
7
8
9
10
11
12
13
14
15
16
17
...
"devDependencies": {
"gulp": "^3.9.0",
"gulp-inject": "^3.0.0",
"gulp-typescript": "^2.10.0",
"gulp-tsd": "^0.0.4",
"tsd": "^0.6.5",
"typescript": "^1.7.5",
"ng-annotate-webpack-plugin": "^0.1.2",
"path": "^0.11.14",
"webpack": "^1.11.0",
"webpack-stream": "^2.1.0"
},
"dependencies": {
"angular": "^1.4.8",
"lodash": "^4.0.0"
}

需要disable visual studio裡面對於typescript的compile,編輯csproj的第一個

1
2
加入這個讓vs不要在Build的時候編譯Typescript
<TypeScriptCompileBlocked>true</TypeScriptCompileBlocked>

另外需要

1
2
3
<PropertyGroup Condition=" '$(Configuration)|$(Platform)' == 'Debug|AnyCPU' ">
在這個項目下,增加
<TypeScriptModuleKind>commonjs</TypeScriptModuleKind>

Angular 在 Components之間的值得傳遞方式分割成Inputs和Outputs. 寫法如下

1
2
3
4
5
6
7
8
9
10
11
12
13
14
15
16
17
18
@Components({
....,
inputs:['init'],
outputs:['finish']
})
export class xxx(){
okEvent: EventEmitter<any> = new EventEmitter();

ok(){
// this should match the type define in EventEmitter
this.okEvent.emit('the value want to pass');
}
}

// in another components
<ddd (finish)="finish($event)" [init]="value pass in"></ddd>

$event => will catch the return value

另外一種寫法

1
2
3
4
5
6
7
8
9
10
11
12
13
14
15
16
17
18
19
20
21
import { Component, View, Input, Output, EventEmitter } from 'angular2/angular2';

@Components({
....
})
export class xxx(){
@Input() init;
// @Output(alias name)
@Output('finish') okEvent:EventEmitter<Any> = new EventEmitter();


ok(){
// this should match the type define in EventEmitter if use typescript
this.okEvent.emit('the value want to pass');
}
}

// in another components
<ddd (finish)="finish($event)" [init]="value pass in"></ddd>

$event => will catch the return value

After Scaffold from existing datbase, and then add migration at first time.

EF will create something like above. But in first migration will have everything that already existed in database. therefore, delete that file and add migration again. Now this time. you will get an empty migration file. WHy? because ContextModelSnapShot. It seems EF will compare all model files with snapshot file. and find the differences to create migration content file.

And Now it switch to Code first mode. ^^

EF 7 Doc